2.4 Starting the Installation
Important: By default, the installation will not make any changes to your disk(s) until you see the following message:
Last Chance: Are you SURE you want continue the installation?

If you're running this on a disk with data you wish to save then WE
STRONGLY ENCOURAGE YOU TO MAKE PROPER BACKUPS before proceeding!

We can take no responsibility for lost disk contents!
The install can be exited at any time prior to the final warning without changing the contents of the hard drive. If you are concerned that you have configured something incorrectly you can just turn the computer off before this point, and no damage will be done.
2.4.1 Booting
2.4.1.1 Booting for the i386™
-
Start with your computer turned off.
-
Turn on the computer. As it starts it should display an option to enter the system set up menu, or BIOS, commonly reached by keys like F2, F10, Del, or Alt+S. Use whichever keystroke is indicated on screen. In some cases your computer may display a graphic while it starts. Typically, pressing Esc will dismiss the graphic and allow you to see the necessary messages.
-
Find the setting that controls which devices the system boots from. This is usually labeled as the “Boot Order” and commonly shown as a list of devices, such as Floppy, CDROM, First Hard Disk, and so on.
If you needed to prepare boot floppies, then make sure that the floppy disk is selected. If you are booting from the CDROM then make sure that that is selected instead. In case of doubt, you should consult the manual that came with your computer, and/or its motherboard.
Make the change, then save and exit. The computer should now restart.
-
If you needed to prepare boot floppies, as described in Section 2.3.7, then one of them will be the first boot disc, probably the one containing boot.flp. Put this disc in your floppy drive.
If you are booting from CDROM, then you will need to turn on the computer, and insert the CDROM at the first opportunity.
If your computer starts up as normal and loads your existing operating system, then either:
-
The disks were not inserted early enough in the boot process. Leave them in, and try restarting your computer.
-
The BIOS changes earlier did not work correctly. You should redo that step until you get the right option.
-
Your particular BIOS does not support booting from the desired media.
-
-
FreeBSD will start to boot. If you are booting from CDROM you will see a display similar to this (version information omitted):
Booting from CD-Rom...
CD Loader 1.2

Building the boot loader arguments
Looking up /BOOT/LOADER... Found
Relocating the loader and the BTX
Starting the BTX loader

BTX loader 1.00 BTX version is 1.01
Console: internal video/keyboard
BIOS CD is cd0
BIOS drive C: is disk0
BIOS drive D: is disk1
BIOS 639kB/261120kB available memory

FreeBSD/i386 bootstrap loader, Revision 1.1

Loading /boot/defaults/loader.conf
/boot/kernel/kernel text=0x64daa0 data=0xa4e80+0xa9e40 syms=[0x4+0x6cac0+0x4+0x88e9d]
\
If you are booting from floppy disc, you will see a display similar to this (version information omitted):
Booting from Floppy...
Uncompressing ... done

BTX loader 1.00  BTX version is 1.01
Console: internal video/keyboard
BIOS drive A: is disk0
BIOS drive C: is disk1
BIOS 639kB/261120kB available memory

FreeBSD/i386 bootstrap loader, Revision 1.1

Loading /boot/defaults/loader.conf
/kernel text=0x277391 data=0x3268c+0x332a8 |

Insert disk labelled "Kernel floppy 1" and press any key...
Follow these instructions by removing the boot.flp disc, insert the kern1.flp disc, and press Enter. Boot from first floppy; when prompted, insert the other disks as required.
-
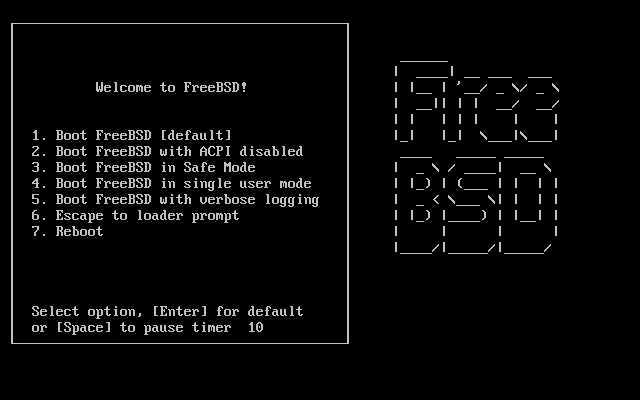
Whether you booted from floppy or CDROM, the boot process will then get to the FreeBSD boot loader menu:
Either wait ten seconds, or press Enter.
2.4.1.2 Booting for the Alpha
-
Start with your computer turned off.
-
Turn on the computer and wait for a boot monitor prompt.
-
If you needed to prepare boot floppies, as described in Section 2.3.7 then one of them will be the first boot disc, probably the one containing boot.flp. Put this disc in your floppy drive and type the following command to boot the disk (substituting the name of your floppy drive if necessary):
>>>BOOT DVA0 -FLAGS '' -FILE ''
If you are booting from CDROM, insert the CDROM into the drive and type the following command to start the installation (substituting the name of the appropriate CDROM drive if necessary):
>>>BOOT DKA0 -FLAGS '' -FILE ''
-
FreeBSD will start to boot. If you are booting from a floppy disc, at some point you will see the message:
Insert disk labelled "Kernel floppy 1" and press any key...
Follow these instructions by removing the boot.flp disc, insert the kern1.flp disc, and press Enter.
-
Whether you booted from floppy or CDROM, the boot process will then get to this point:
Hit [Enter] to boot immediately, or any other key for command prompt.
Booting [kernel] in 9 seconds... _
Either wait ten seconds, or press Enter. This will then launch the kernel configuration menu.
2.4.1.3 Booting for Sparc64®
Most Sparc64® systems are set up to boot automatically from disk. To install FreeBSD, you need to boot over the network or from a CDROM, which requires you to break into the PROM (OpenFirmware).
To do this, reboot the system, and wait until the boot message appears. It depends on the model, but should look about like:
Sun Blade 100 (UltraSPARC-IIe), Keyboard Present
Copyright 1998-2001 Sun Microsystems, Inc.  All rights reserved.
OpenBoot 4.2, 128 MB memory installed, Serial #51090132.
Ethernet address 0:3:ba:b:92:d4, Host ID: 830b92d4.
If your system proceeds to boot from disk at this point, you need to press L1+A or Stop+A on the keyboard, or send a BREAK over the serial console (using for example ~# in tip(1) or cu(1)) to get to the PROM prompt. It looks like this:
okok {0}

At this point, place the CDROM into your drive, and from the PROM prompt, type boot cdrom.
2.4.2 Reviewing the Device Probe Results
The last few hundred lines that have been displayed on screen are stored and can be reviewed.
To review the buffer, press Scroll Lock. This turns on scrolling in the display. You can then use the arrow keys, or PageUp and PageDown to view the results. Press Scroll Lock again to stop scrolling.
Do this now, to review the text that scrolled off the screen when the kernel was carrying out the device probes. You will see text similar to Figure 2-2, although the precise text will differ depending on the devices that you have in your computer.
Figure 2-2. Typical Device Probe Results
avail memory = 253050880 (247120K bytes)
Preloaded elf kernel "kernel" at 0xc0817000.
Preloaded mfs_root "/mfsroot" at 0xc0817084.
md0: Preloaded image </mfsroot> 4423680 bytes at 0xc03ddcd4

md1: Malloc disk
Using $PIR table, 4 entries at 0xc00fde60
npx0: <math processor> on motherboard
npx0: INT 16 interface
pcib0: <Host to PCI bridge> on motherboard
pci0: <PCI bus> on pcib0
pcib1:<VIA 82C598MVP (Apollo MVP3) PCI-PCI (AGP) bridge> at device 1.0 on pci0
pci1: <PCI bus> on pcib1
pci1: <Matrox MGA G200 AGP graphics accelerator> at 0.0 irq 11
isab0: <VIA 82C586 PCI-ISA bridge> at device 7.0 on pci0
isa0: <iSA bus> on isab0
atapci0: <VIA 82C586 ATA33 controller> port 0xe000-0xe00f at device 7.1 on pci0
ata0: at 0x1f0 irq 14 on atapci0
ata1: at 0x170 irq 15 on atapci0
uhci0 <VIA 83C572 USB controller> port 0xe400-0xe41f irq 10 at device 7.2 on pci
0
usb0: <VIA 83572 USB controller> on uhci0
usb0: USB revision 1.0
uhub0: VIA UHCI root hub, class 9/0, rev 1.00/1.00, addr1
uhub0: 2 ports with 2 removable, self powered
pci0: <unknown card> (vendor=0x1106, dev=0x3040) at 7.3
dc0: <ADMtek AN985 10/100BaseTX> port 0xe800-0xe8ff mem 0xdb000000-0xeb0003ff ir
q 11 at device 8.0 on pci0
dc0: Ethernet address: 00:04:5a:74:6b:b5
miibus0: <MII bus> on dc0
ukphy0: <Generic IEEE 802.3u media interface> on miibus0
ukphy0: 10baseT, 10baseT-FDX, 100baseTX, 100baseTX-FDX, auto
ed0: <NE2000 PCI Ethernet (RealTek 8029)> port 0xec00-0xec1f irq 9 at device 10.
0 on pci0
ed0 address 52:54:05:de:73:1b, type NE2000 (16 bit)
isa0: too many dependant configs (8)
isa0: unexpected small tag 14
orm0: <Option ROM> at iomem 0xc0000-0xc7fff on isa0
fdc0: <NEC 72065B or clone> at port 0x3f0-0x3f5,0x3f7 irq 6 drq2 on isa0
fdc0: FIFO enabled, 8 bytes threshold
fd0: <1440-KB 3.5'' drive> on fdc0 drive 0
atkbdc0: <Keyboard controller (i8042)> at port 0x60,0x64 on isa0
atkbd0: <AT Keyboard> flags 0x1 irq1 on atkbdc0
kbd0 at atkbd0
psm0: <PS/2 Mouse> irq 12 on atkbdc0
psm0: model Generic PS/@ mouse, device ID 0
vga0: <Generic ISA VGA> at port 0x3c0-0x3df iomem 0xa0000-0xbffff on isa0
sc0: <System console> at flags 0x100 on isa0
sc0: VGA <16 virtual consoles, flags=0x300>
sio0 at port 0x3f8-0x3ff irq 4 flags 0x10 on isa0
sio0: type 16550A
sio1 at port 0x2f8-0x2ff irq 3 on isa0
sio1: type 16550A
ppc0: <Parallel port> at port 0x378-0x37f irq 7 on isa0
pppc0: SMC-like chipset (ECP/EPP/PS2/NIBBLE) in COMPATIBLE mode
ppc0: FIFO with 16/16/15 bytes threshold
plip0: <PLIP network interface> on ppbus0
ad0: 8063MB <IBM-DHEA-38451> [16383/16/63] at ata0-master UDMA33
acd0: CD-RW <LITE-ON LTR-1210B> at ata1-slave PIO4
Mounting root from ufs:/dev/md0c
/stand/sysinstall running as init on vty0
Check the probe results carefully to make sure that FreeBSD found all the devices you expected. If a device was not found, then it will not be listed. A custom kernel allows you to add in support for devices which are not in the GENERIC kernel, such as sound cards.
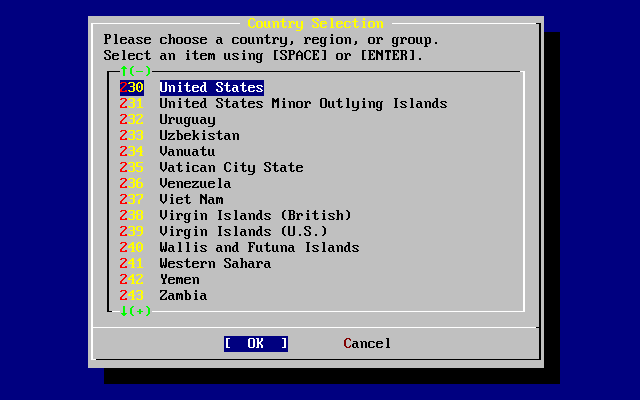
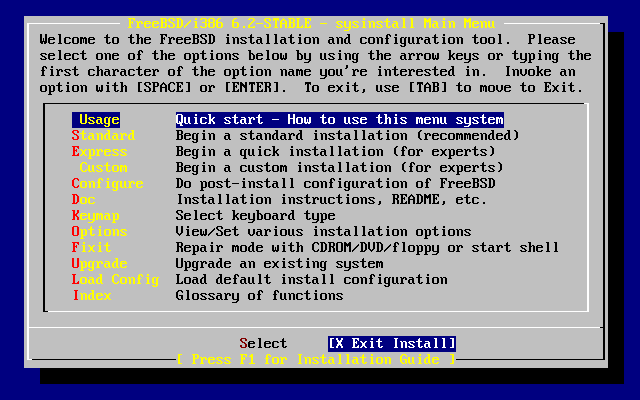
For FreeBSD 6.2 and later, after the procedure of device probing, you will see Figure 2-3. Use the arrow key to choose a country, region, or group. Then press Enter, it will set your country and keymap easily. It is also easy to exit the sysinstall program and start over again.
Use the arrow keys to select Exit Install from the Main Install Screen menu. The following message will display:
                      User Confirmation Requested
         Are you sure you wish to exit? The system will reboot
           (be sure to remove any floppies/CDs/DVDs from the drives).

                            [ Yes ]    No
The install program will start again if the CDROM is left in the drive and [ Yes ] is selected.
If you are booting from floppies it will be necessary to remove the boot.flp floppy before rebooting.


